|
|
|
|
|
|
Contact: ![zenseeker [at] hotmail [dot] com](http://zenseeker.net/Menu/EmailImage.gif)
Suzuki DR650 Signal Lights Page

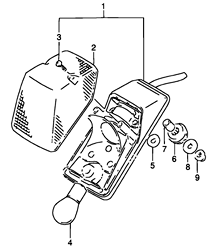
The stock lights on the DR650 are large, like to grab tree limbs and do not stay on as running lights.
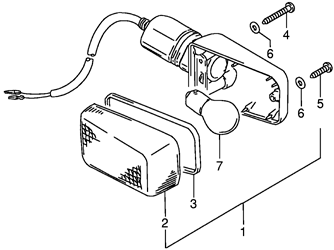
Stock DR650 Turn Signal
Related Links:
LED lighting varies greatly in performance and are not all created equal. Most economical LEDs are of very poor quality and should not be used if your intent is to increase bike safety and visibility during the day. A few LEDs are actually brighter than the stock incandescent lights that come with the DR650, and can be pricey and difficult to find.
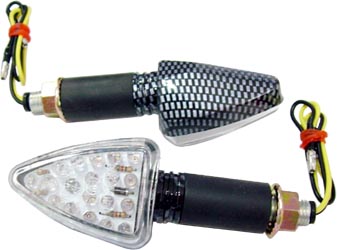
LEDs are generally more directional than a regular bulb. This makes them more difficult to see at angles other than straight on. But since LED signals are easy to find in various sizes and draw every little electricity, you can mount a set facing out to the sides of your bike.
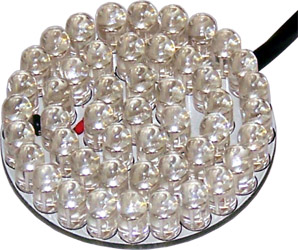
LED Cluster
Since LEDs don't have to warm up, they generally light up immediately and blink faster than stock lights. It would seem that the quicker cycling of blinks would get you noticed better, but there also seems to be an increase prevalence of ambulance collisions after upgrading to LEDs.
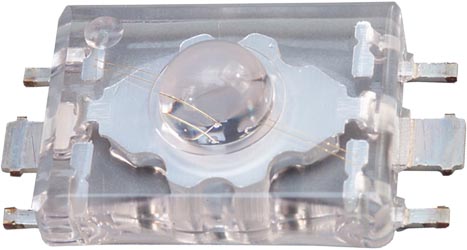
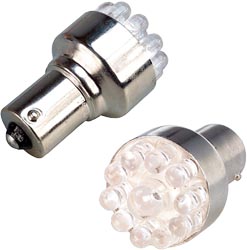
Single LED
Since they don't create a real noticeable load or voltage drop in their circuit, some blinker relays will not work with LED lights. You will need to load to the circuit to make some blinker relays work, or use a heavy duty variable load flasher relay that doesn't rely on an electrical load to trigger them.
Related Links:
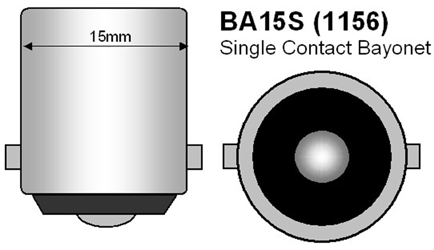
DR650 Turn Signal Bulb Base
The DR650s used common bulbs in its brake, turn, running and indicator lights. Because of this, there are many bulb options available for the stock setup on the DR650s. And for those that want to tinker, extra bulb sockets or different socket types can be added to the various lights on your DR to allow for brighter and or variable lighting - such as when you want to convert a 1156 turn light into a 1157 running/turn light.
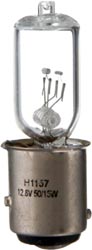
Halogen H1157 Brake Light
Very high wattage bulbs, such as the H1157 Halogen bulb can be used in the stock housings, but these can melt the plastic housings and lenses with long term use or heavy brake use, such as in stop and go traffic. It can be fun to have the brightest highest wattage plastic melting brake light on the highway, but this could potentially overload the dinky Suzuki wiring and cause a fire down the road - on some back road in the middle of nowhere. It's also important to note that halogen bulbs need a little time to warm up and there will be a slight delay between application of the brakes and the brake light becoming noticeable.
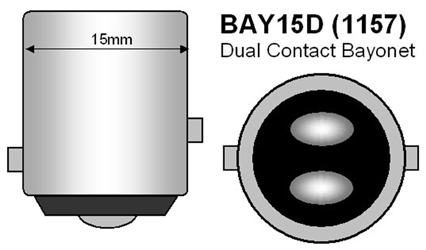
DR650 Brake Light Bulb Base
For dual wattage bulbs such as the one used in the stock brake light assembly and sometimes in the turn signals of other bikes, it's not just about how bright they are, it's also the difference in how bright the two wattages are. When you apply your the brakes or use your turn signals, if drivers and riders around you can't readily notice an immediate change in the brightness of the light, you might get rear ended or passed on the side you are turning towards. And since many bulbs share the same bulb base, you have several options to choose from, with some worse than others.
Double Contact (DC) Index Bayonet (BAY15d) Base Dual Filament Bulb Options
| Bulb# | Filament | # Voltage | Amperage | Watts | Contrast | Life Hours | CP | Notes |
|
Economy LED |
Low | 14.0 | 0.01 | 0.14 | 100,000 | Dim |
Very efficient, Long life (some), Appear Dim |
|
| High | 14.0 | 0.01 | 0.14 | 100,000 | Dim | |||
| 2057 | Low | 14.0 | 0.48 | 6.86 | 75.00% | 5000 | 2 | Dim tail light, high contrast |
| High | 12.8 | 2.10 | 26.88 | 1200 | 32 | |||
| 1034 | Low | 14.0 | 0.59 | 8.26 | 64.15% | 5000 | 3 |
More efficient, shorter life |
| High | 12.8 | 1.80 | 23.04 | 200 | 32 | |||
| 1157 | Low | 14.0 | 0.59 | 8.26 | 69.27% | 5000 | 3 |
Common bulb, great lifespan |
| High | 12.8 | 2.10 | 26.88 | 1200 | 32 | |||
| 2397 | Low | 14.0 | 0.59 | 6.72 | 76.45% | 5000 | 2 |
Dimmer/brighter and higher contrast |
| High | 12.8 | 2.23 | 28.54 | 400 | 40 | |||
| 2357 | Low | 14.0 | 0.59 | 8.26 | 71.06% | 5000 | 3 | Brighter brake light |
| High | 12.8 | 2.23 | 28.54 | 400 | 40 | |||
| 7528 | Low | 14.0 | 0.42 | 5.88 | 73.75% | 1500 | 3 | Slightly brighter brake light |
| High | 12.8 | 1.75 | 22.40 | 150 | 35 | |||
| 7225 | Low | 14.0 | 0.33 | 4.62 | 79.38% | 1500 | 1.2 | Dimmer/brighter and higher contrast |
| High | 12.8 | 1.75 | 22.40 | 150 | 35 | |||
| H1157 | Low | 14.0 | 1.07 | 15 | 70.00% | 400 | 25 | Very bright, melts lens |
| High | 12.8 | 3.90 | 50 | 250 | 107 |
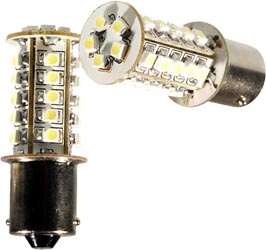
There are many LED bulb replacements options for your running, brake and turn signals. Many fit right in the stock sockets without modification, while others need a little epoxy or some sort of modification. Unfortunately, most LED bulbs are far dimmer than the stock bulb and are a waste of time and money, unless your only goal is to conserve as many watts as you can for other accessories. And since LEDs draw much less current than a stock bulb, you will need a load resistor or non-thermal blinker relay to allow these bulbs to work as turn signals unless a load resistor isn't built into the bulb itself. For using LED bulbs to free up wattage, you will want to avoid using load resistor and instead use a heavy duty variable load flasher relay for your LED turn signal circuit.
In regards to LED light color, an LED works in a completely different manner than an incandescent light. A regular incandescent bulb uses electrical current to heat up a tungsten filament which creates a good amount of heat, and releases a good amount of near-infrared light and to a lesser extent light that approximates a continuous spectrum which appear white. This white light can then be changed to perceived yellow or red by coloring the bulb or lamp housing lens yellow or red, respectively. This yellow or red coloring filters out more of the other colors in the light spectrum, leaving the desired color. This system is very inefficient since most of the energy is used to heat up the bulb is lost as heat, near-infrared light and other undesired wavelengths.
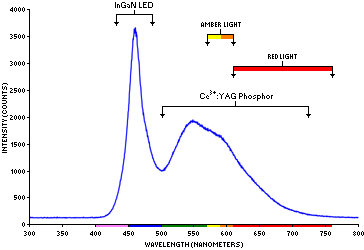
White LED Light Spectrum
An LED light uses a semiconducting material that is impregnated, or "doped", with a specific impurities. As electrical current flows through the LED, electrons drop into "holes" and emit light of a certain wavelengths depending on the material impregnated in the semiconductor. For white light, there are several ways to produce a white appearing light from an LED. One method is to mix two or more colors that combine to produce a white color. A more common method is to place a indium gallium nitride (InGaN) ultra bright blue diode in a patch of phosphorescing dye that absorbs much of the emitted blue light and reemits it at a lower energy and in a wider spectrum which appears white.
Why is this science important to my DR650? If you place a "white" LED cluster in a taillight housing that is red, most of the light that isn't red will be filtered out by the red lens and not utilized. If you use a red LED cluster in a red lens, a greater percentage of this light will make it through the lens to the cagers behind and next to you. In other words, you should always match the LED bulb color with the lens you are using if that's the final color you want. A red rear light needs a red LED. An amber light needs an amber LED.
Related Links:
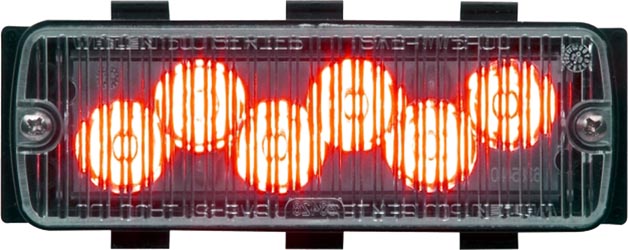
Lightheads are the bright lights used on emergency vehicles that you notice way down the freeway when there is an accident or cop giving out tickets. They are hard to miss and if you use these as turn/brake lights, you can go from the small blinking hard to notice stock turn signal into a flashing blinding strobe that can't be missed. These can be so bright that they may not be legal for use in your part of the world and should not be used as running lights.
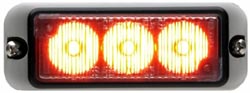
Whelen TIR3 Lighthead
Whelen TIR3 & LIN3 lightheads are small enough that they can be easily fitted on a bike for brake and signal lights. Both are extremely bright but the LIN3 has greater angles of visualization which allows them to be better seen by others at right angles to the face of the light.
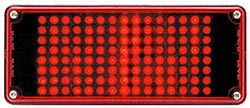
Whelen 70R00XRR Brake Light
The Whelen brake/run light Model 70R00XRR is a great high intensity light that is far brighter than the stock rear running and brake lights that come with the DR650. They are larger than the TIR3 & LIN3 lightheads, so you will need to get creative when mounting them. They put out a reasonable amount of light, while still remaining reasonable and not blinding.
Other lightheads such as the Whelen TIR6 have been used as brake lights, but are actually a little much. But if that's what you are looking for, there are options out there for you.
Related Links:
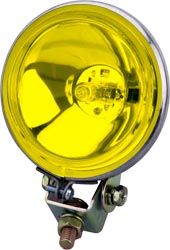
If you are looking for a frontal turn signal that can't be missed, one option is using yellow fog lights on each side of your headlights and wire them to blink. You will need a heavy duty relay system and and heavy duty flasher relay to make this safely work. The advantage of using fog lights as turn signals is that they will significantly increase your frontal signature day or night, as well as increase road illumination.

If the lamp of your choice doesn't come in yellow, you can always go with a yellow bulb or tint the lamp lens yellow.
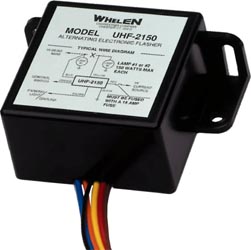
A 150 watt alternating electronic flasher is a bit overkill for turn signals, but is certainly up to the challenge of controlling high output lights, especially for emergency vehicle identification.
Signal Light Size and Mounting
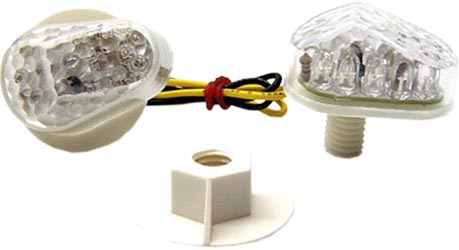
LED Flush Mount Light
The stock DR650 signal light are huge and don't seem to do a good job of surviving crasher and close encounters with trees. This is one of the reasons that riders may "upgrade" to an economy LED or other light; they not only "look cool" on the bike when parked, they are often smaller than the stock lights and less prone to damage.
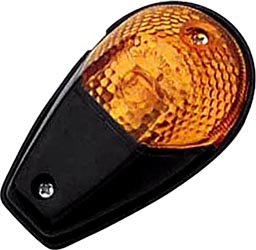
Incandescent Flush Mount Light
You have many options with aftermarket and junkyard turn signals they can even be flush mounted on the fenders themselves, making them more likely to survive a crash than stock ones. Plus, if you flush mount your turn signals, you won't be tempted to use them as a tie down point for gear.
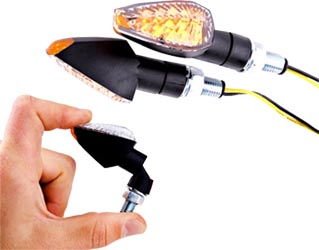
Crash Lights
Some lights come with flexible arms that allow them to bend and spring back after a collision. These work, but are so so for durability.
Related Links:
The DRs came with one of two different rear brake lights. One is a big monstrosity used in the US and the other is a smaller angled flush mounted one used most everywhere else. One simple upgrade is to find a smaller one from a smaller DR and use it to replace the old one. If you are feeling a little crafty, you can actually fit two of the smaller ones side by side. These can be used as turn/brake/running combos or just as dual brake lights. If you don't upgrade to LED, you may wish to upgrade the wiring a bit, since these light come with some really small gauge wires, and you will be doubling the wattage with two.
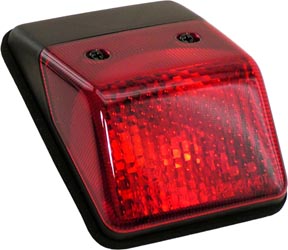
Smaller Stock DR Rear Light
If you have hard cases on your bike, you can mount a high intensity ambulance light (Whelen 70R00XRR) facing to the rear. This has a larger signature than the stock light and is far brighter as a running and as a brake light. I use one high intensity ambulance running/brake light, two high intensity emergency lightheads as turn/brake signals and two side-by-side replica small brake lights with LED bulb (wired with brake light always on) to work as a running lights (the LED used is dim compared to these other lights).
Related Links:
Hyperlites - Bright but overpriced
It seems that most bikes other than cruisers lack running lights. The DR does come with some on the rear or the rear fender, but this overhang is often removed after the license plate is moved up - leaving you with just the rear brake light and headlight on. Extra running lights will help your bike look more like a bike at night, and not just one of the taillights of the car in front of you or headlight of the car behind you.
You can wire your front and rear turn signals to run all the time and blink when activated. This requires a bit of wiring (see below), but is well worth it for the extra safety it may provide. Rear running lights should be red as not to blind tailgaters but there seem to be a few bikes on the road with lit up rear amber lights. So depending on your local law enforcement mood, you may be able to get away with rear amber running lights.
High intensity emergency signal lights should not be used as rear running lights, as you will blind someone at night (possibly permanently) - which can't be good for your own safety. However, on the front of a bike, these, as well as fog lights and other bright lights can be used as running or running/turn combo lights.
Side markers can be flush mounted on your fenders or mounted at 90 degrees to your other lights. If wired as running/turn signals, they will help announce your plans to those next to you in your blind spot.
For the US:
49 CFR Ch. V (10–1–04 Edition) § 571.108
TABLE III—REQUIRED MOTOR VEHICLE
LIGHTING EQUIPMENT
[All Passenger Cars and Motorcycles, and Multipurpose Passenger Vehicles,
Trucks, Buses and Trailers of Less Than 80 (2032) Inches (mm) Overall Width]
|
Item |
Motorcycles | Applicable SAE standard or recommended practice (See S5 for subreferenced SAE materials) |
| Headlamps | See S7.9 | J566 January 1960. |
| Taillamps | 1 red | J585e, September 1977. |
| Stoplamps | 1 red | SAE J586, February 1984. |
| High-mounted stoplamp. | Not required | J186a, September 1977. |
| License plate lamp. | 1 white | J587, October 1981. |
| Parking lamps | None | J222, December 1970. |
| Reflex reflectors | 3 red; 2 amber | J594f, January 1977. |
| Intermediate side reflex reflectors. | None | J594f, January 1977. |
| Intermediate side marker lamps. | None | J592e, July 1972. |
| Side marker lamps. | None | J592e, July 1972. |
| Backup lamp | None | J593c, February 1968. |
| Turn signal lamps | 2 amber; 2 red or amber. | SAE J588, November 1984. |
| Turn signal operating unit.3, 4. | 1 | J589, April 1964. |
| Turn signal flasher | 1 | J590b, October 1965. |
| Vehicular hazard warning signal operating unit. | None | J910, January 1966. |
| Vehicular hazard warning signal flasher. | None | J945, February 1966 |
TABLE IV—LOCATION OF REQUIRED EQUIPMENT
[All Passenger Cars and Motorcycles, and Multipurpose Passenger Vehicles, Trucks, Trailers, and Buses of Less than 80 (2032) Inches (MM) Overall Width]
| Item | Location on Motorcycles | Height above road surface measured from center of item on vehicle at curb weight |
| Headlamps | See S7.9 Motorcycles | Not less than 22 inches (55.9 cm) nor more than 54 inches (137.2 cm). |
| Taillamps | On the rear—on the vertical centerline except that if two are used, they shall be symmetrically disposed about the vertical centerline. | Not less than 15 inches, nor more than 72 inches. |
| Stoplamps | On the rear—on the vertical centerline except that if two are used, they shall be symmetrically disposed about the vertical centerline. | Not less than 15 inches, nor more than 72 inches. |
| High-mounted stoplamp. | Not required | See S5.3.1.8 for passenger cars. Not less than 34 inches for multipurpose passenger vehicles, trucks, and buses. |
| License plate lamp | At rear license plate | No requirement. |
| Parking lamps | Not required | Not less than 15 inches, nor more than 72 inches. |
| Reflex reflectors | On the rear—1 red on the vertical centerline except that, if two are used on the rear, they shall be symmetrically disposed about the vertical centerline.
On each side—1 red as far to the rear as practicable, and 1 amber as far to the front as practicable. |
Not less than 15 inches, nor more than 60 inches. |
| Backup lamp | Not required | No requirement. |
| Turn signal lamps | At or near the front—1 amber on each side of the vertical centerline at the same height, and having a minimum horizontal separation distance (centerline of lamps) of 16 inches. Minimum edge to edge separation distance between lamp and headlamp is 4 inches.
At or near the rear—1 red or amber on each side of the vertical centerline, at the same height and having a minimum horizontal separation distance (centerline to centerline of lamps) of 9 inches. Minimum edge to edge separation distance between lamp and tail or stop lamp is 4– inches, when a single stop and taillamp is installed on the vertical centerline and the turn signal lamps are red.. |
Not less than 15 inches, nor more than 83 inches. |
| Side marker lamps | Not required | Not less than 15 inches. |
| Intermediate side marker lamps. | Not required | Not less than 15 inches. |
| Intermediate side marker reflectors. | Not required | Not less than 15 inches, nor more than 60 inches. |
NOTE:
(1) The term overall width refers to the nominal design dimension of the widest part of the vehicle, exclusive of signal lamps, marker lamps, outside rearview mirrors, flexible fender extensions, and mud flaps, determine with doors and windows closed, and the wheels in the straight-ahead position. This supersedes the interpretation of the term ‘‘overall width’’ appearing in the FEDERAL REGISTER of March 1, 1967 (32 FR 3390).
(2) Paragraph S3.1 and Tables I and III of § 571.108 as amended (32 FR 18033, Dec. 16, 1967), specify that certain lamp assemblies shall conform to applicable SAE Standards. Each of these basically referenced standards subreferences both SAE Standard J575 (tests for motor vehicle lighting devices and components) which in turn references SAE Standard J573 on bulbs, and SAE Standard J567 on bulb sockets.
(3) Paragraph C of SAE Standard J575 states in part: ‘‘Where special bulbs are specified, they should be submitted with the devices and the same or similar bulbs used in the tests and operated at their rated mean spherical candlepower.’’ The Administrator has determined that this provision of SAE Standard J575 permits the use of special bulbs, including tubular-type bulbs, which do not conform to the detailed requirements of Table I of SAE Standard J573. It follows that the sockets for special bulbs need not conform to the detailed requirements of SAE Standard J567. These provisions for special bulbs in no way except the lamp assemblies from meeting all performance requirements specified in Federal Standard No. 108, including those specified in the basically referenced SAE Standards, and in the subreferenced SAE Standard J575.
You can wire your turn signals to work as running lights as well as turn/brake light combos. This increases the light signature of your bike and makes it more noticeable, especially at night.
To use signal lights as running lights, you may need to use two bulbs per signal (a low amp one as a runner and a higher amp as a signal), a dull amp bulb, or a relay system possibly with resistors.
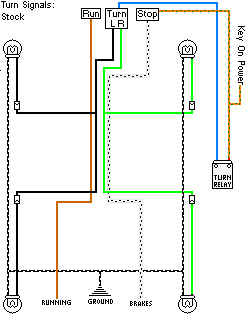
Relay systems can be purchased ready made for some bikes, converted from trailer light boxes, vintage VW relay boxes, or made with simple auto relays. Wiring can be tricky, and here are a few wiring examples that reroute the electricity around the bike's turn relay:
|
|
|
|
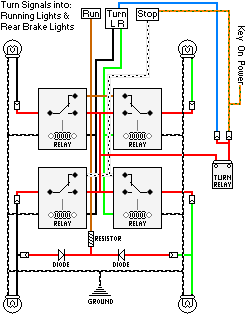
| Here is an example of a stock wiring setup in a pre'96 DR650. In post 1995 DR650SEs, the Key-On Power wire is orange and not orange with green stripes. | This wiring scheme uses 4 Single Pole Double Throw (SPDT) Relays, 2 unidirectional diodes (unless you wire the running light into the pre-relay brake wire), a resistor and some creative wiring to convert your rear signal lights into Brake/Running/Turn signals and the front lights into Running/Turn signals. | |
|
|
|
|
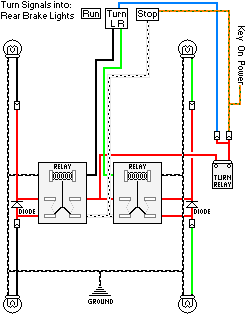
| For Running/Turn lights, you simply need 2 DPDT or SPDT relays. | For Brake/Turn lights, you will need 2 Dual Pole Dual Throw (DPDT) relays and 2 unidirctional diodes if you don't want the brake lights to come on in the front of the bike. If you want the brake lights to also come on in the front, you can use 2 SPDT relays and forgo using the diodes. |
Note that the wiring diagrams above are color coded for pre1996 DR650s. Newer DR650SEs have a similar color scheme, but the power wire to the brakes and turn relay is Orange and not Orange with green stripes as shown above. The wires to the stock brake and running lights are removed in the modified diagrams to reduce clutter. See the wiring diagrams on the Electrical Page for more information.
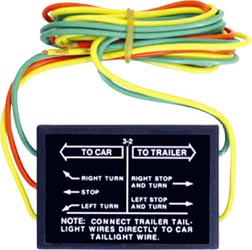
Trailer Light 3-2 Conversion Box
A trailer converter box allows you to consolidate two lights into one. The Red wires are ones the rider needs to add to the circuit to make it work. The three to one converter box shown above allows you a simple and economical way of wiring your brake or running lights with your turn signals. Unfortunately, these wiring boxes are often rated only for small amperage (~2 amps), but these should work for most bike setups and almost an unlimited amount of LED lights.
Related Links:
The stock light switch on US, Canadian and Australian bikes lack a light kill switch. This is unfortunate, as there are times when you would like to kill your headlights, such as when starting your bike, conserving battery reserve for other accessories or when in evasion mode.
 |
 |
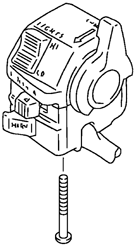
Stock Left Handlebar Switch |
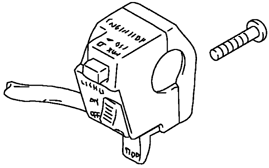
Stock Right Handlebar Switch |
If you don't have a headlight kill switch, you can add one to one of your handlebar switches, one to your handlebar or replace the light switch assembly altogether. If you do add a switch, it is better to use the kill switch to power on/off a separate relay instead of running the headlight circuit directly through the switch. If you run the headlight circuit through he kill switch, you increase the resistance in your light circuit which will decrease the overall light output of your headlights and possibly create a fire hazard.
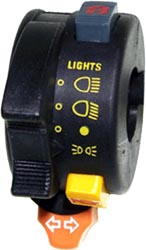
Aftermarket Light Switch
There are a number of aftermarket light switches and switches from other bikes and military vehicles that will do a good job of managing your headlight preference. Some of these are unfortunately lacking in the quality department, but if you are using relays for your lights, they should work fine for the most part.
Related Links:
Please feel free to link to this site so that others can find it. It's easy to link to this site, just copy one of the texts below onto your web page:
Copyright © 2000-2014