|
|
|

|
|
|
Contact: ![zenseeker [at] hotmail [dot] com](http://zenseeker.net/Menu/EmailImage.gif)
Suzuki DR650 Gas, Fuel, Petrol Tank Page

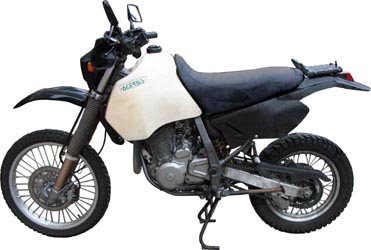
The DR650 started out with a nice 21 liter fuel tank and in an effort to cut weight, went to a 17 liter fuel tank in 1992. In 1996, Suzuki decided on a 13L fuel tank for it's lighter DR650SE. The stock fuel tanks, particularly in the newer 1996+ DRs, are less than ideal for long runs in remote areas or even for weekly commutes. This can really limit how far you can travel into the outback before you need to turn back for fuel. It also increases the number of fill-ups you will need each week if you are commuting with your DR650.
Luckily, there are several fuel tank upgrade options available and you can always strap on an extra fuel can or two.
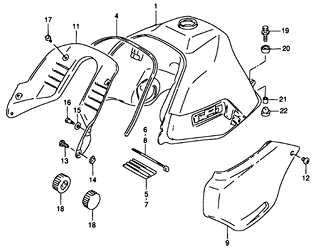
Pre 96 DR650 Steel Fuel Tank
Pre 1996 DR650s (Stock - 1990-91 21L; 1992-95 4.5gal/17L; 1992-95 California 4.2gal/16L):
Post 1996 DR650s (Stock 3.4 gal (13L) or 3.2 gal (12L) for California DRs):
Generic Auxiliary Fuel Tanks and the like:
Post 96 DR650 with pre 96 Acerbis tank
Links:
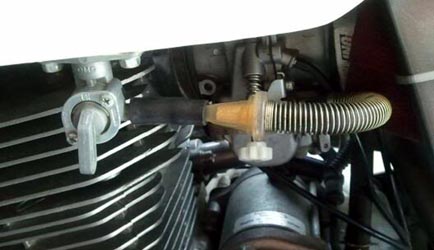
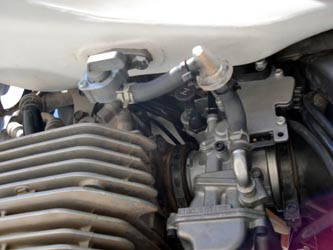
The stock petcock uses a vacuum assist so that it doesn't flood the carburetor and engine should the carb float get stuck. This is a good safety feature but the vacuum diaphragm has been known to get stuck making starts impossible.
The stock petcock has three settings:
PRI - PRIME - allows for free flow of fuel
ON - ON - allows for fuel to flow when vacuum applied to vacuum line
RES - RESERVE- allows for reserve fuel to flow with vacuum to vacuum line
Related Links:
Kientech Pingel Petcock
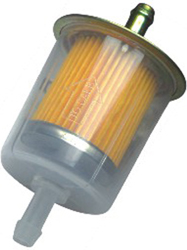
Seems like a good idea and they can also save your carburetor or engine.. Some DR riders recommend against these as there already is a filter sock in the stock tank making an additional filter redundant, unnecessary and another item to fail. They can also get clogged up, which means they are doing their job. In line filters are also much easier and less messy to replace or clean than a petcock filter. Because of this, some riders remove the petcock screen and install an inline filter.

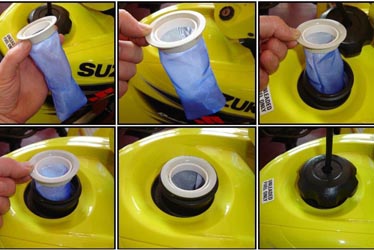
Strainers can be used in the fuel tank to decrease the amount of debris that settles at the bottom of your tank. This is especially useful if travelling in places where you end up refueling form a fuel can instead of from a computerized pump that accept credit cards.

Why would you set up a petrol stand in front of a big puddle of water? On the bight side, compared to the pump in the town down the road, at least you can see if there is any sediment present in this fuel. And then you can use the bottle for drinking water later, but I won't advise drinking out of it.
Most of the fuel tanks available for the DR650s are plastic polyethylene. They are sometimes made in a handful of basic colors or come in just white. If you don't care about esthetics, these are just fine, as they are waterproof, lightweight, don't rust and although they may not be road legal, the authorities generally don't know or care. If you do care about how your bike looks, in that you want a nice looking bike or one that blends into the environment or just don't want a bike that looks like a toy put together by a child - you may have a challenge on your hand.
It is difficult and sometimes impossible to get paint to stick and stay on polyethylene. This is partially do the the physical characteristics of poly which resists paints sticking to it, the flexibility of poly and the fact that gas vapors seem to breath through the poly which can cause bubbling of paint. People have tried sanding, torching, priming, sealing the inside of the tanks and painting these tanks with various types of paint with mixed results - most of them poor.
For metal tanks, rattle can jobs are fine. You can get a reasonable paint job with a little prep work, or at the very least - a new color for not very much money. the is great for the blacked out look or camo jobs and touchups after crashes are simple and cheap.
For plastic tanks, some rattle cans stick to better than others, but they all seem to eventually scratch off, with some peeling off by the handful. If you don't care too much about having a "finished" look, you can experiment with paints, find one that sticks and touch up as necessary (perhaps each week). If you do find a good paint that seems to stick, you may find that it will bubble up after its first exposure to the sun.
If you really care about looks and don't plan on every laying down your bike, you can take off a metal tank and paint whatever you want on it.
In regards to plastic tanks - remember what Homer Simpson says. "Trying is the first step to failure." The main problem is that fuel vapors will pass through plastic fuel tanks, but not though paint on tanks. This often results in bubbling of paint (if it doesn't peel off first). You can successfully pain a plastic fuel tank, but it's more challenging than you may think. Even BMW tried painting their plastic tanks on early GS1100's - with disastrous results.
Check out the links below and let me know how your paint job turned out. Some tank painters will stress the need to seal the inside of your tank prior to painting to prevent paint bubbling, but keep in mind all the horror stories out there of tank sealers coming loose inside tanks and make giant messes.
Related Paint links:
Related Tank Sealing links:
Another approach to color, texture and even protection is coating a tank with spray on bedliner. This can a really nice utilitarian/industrial look to it and you can often color match your liner if you don't like black. I've heard of these bubbling up on plastic tanks, but have never seen it.
You can custom make a bra with some heavy duty marine grade vinyl. If you can sew, you've got a project. If you can't sew, you can use vinyl cement to glue pieces together. Since a fuel tank can have a very complex shape, you can use duct tape to make a pattern on the tank, transfer it to the vinyl, cut out the shape and cement them together. With little talent, you can create a new rugged or soft look for your bike.
If you are creative, you can also attach a tank bag, pockets, knife/machete sheath, reflective tape, lights, graphics, studs/spikes, slider plates, rhinestones, trinkets, hand stitched leather, sheep's skin, camouflage netting, etc to a tank cover.
If like the stickered look or have a cool graphic in mind (shark teeth), these should fit onto a metal tank will little effort. If you are placing decals or stickers on a plastic tank, you may need to first perforate them so that they don't bubble up. You can use a sharp knife or a special perforating tool from a hobby store.
Adapter for Acerbis 6.6 gallon (25 liter) Tank
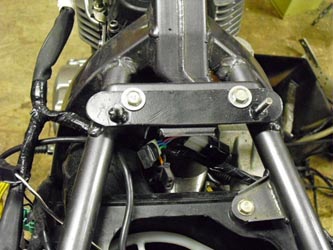
The 6.6 gallon Acerbis tank for pre'96 DR650s is a nice size and larger than all the post '96 DR650SE tank options except for the Aqualine 8 gallon (30 liter) Safari tank and other true safari custom tanks. The 6.6 gallon Acerbis tank is also pretty economical and can be fitted to 1996 and newer DR650SEs with a set of brackets and a few minor adjustments to the bike.

Post 96 DR650 with pre 96 Acerbis tank
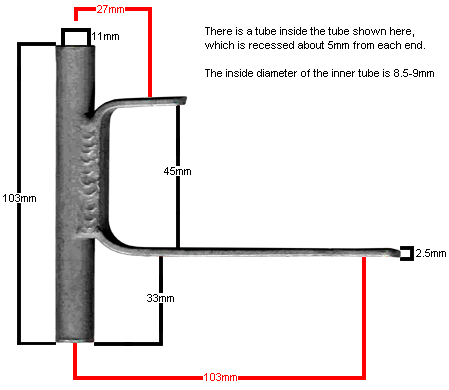
The adapter for this conversion was commercially available in the past, but no longer seems to be readily available. Luckily the adapter brackes are simple to fabricate as long as you have a grinder, drill and welder handy.


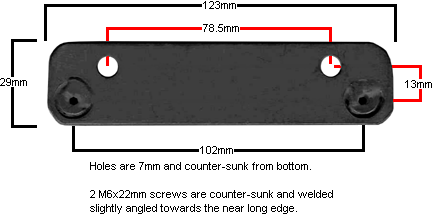
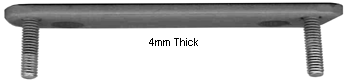
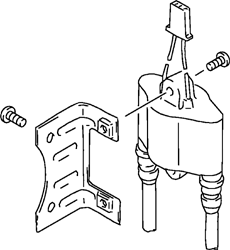
Ignition Coil and Bracket
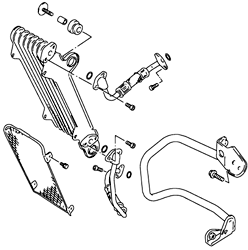
Oil cooler and Guard
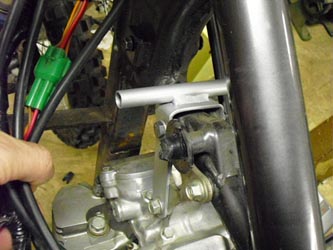
Note: The sleeves behind and
in front of the bracket must be in the correct position, or you will damage
something!
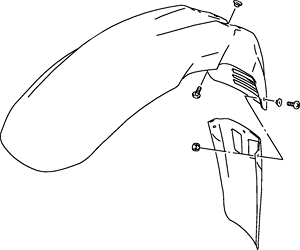
Front Fender
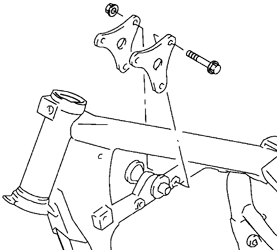
Upper Plates
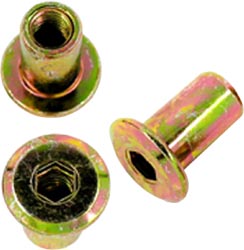

Note: if you can't readily find M6 sleeve nuts, use 5mm longer bolts (M6 x 27mm) for the rear bracket to allow for use of ordinary nuts and washers
Related Links:
Please feel free to link to this site so that others can find it. It's easy to link to this site, just copy one of the texts below onto your web page:
Copyright © 2000-2014